
Best Practices for Cleaning and Prepping of Windows Before Installing Window Graphics
 Window graphics can be a great way to enhance storefronts, promote branding, or add decorative elements to your space. However, for them to look sharp and adhere properly, the surface they’re applied to must be well-prepped. Skipping or rushing through the preparation process can lead to poor adhesion, bubbling, peeling, or unsightly imperfections. Here’s a guide on how to properly clean and prep your windows before installing window graphics.
1. Start with a Thorough Inspection
Before any cleaning or prepping of the windows, examine the window carefully to check for chips, cracks, scratches, or any debris. Address any structural damage before applying graphics. Ensure the glass is smooth and intact, as even small imperfections can affect the graphic’s adhesion.
2. Choose the Right Cleaning Tools
The cleaning tools and products you use are crucial for ensuring that no residue remains on the glass. Here’s what you’ll need:
– Lint-free microfiber cloths: These help prevent streaks and don’t leave behind fibers like paper towels or cotton cloths.
– Squeegee: A rubber-edged squeegee ensures a streak-free finish.
– Spray bottle: Use it to mist the cleaning solution evenly.
– Plastic scraper or razor blade: Ideal for removing tough dirt, paint, stickers, or adhesive residue from previous decals.
– Bucket of warm water: For rinsing or cleaning surfaces with mild soap.
3. Use the Right Cleaning Solution
To achieve a clean, streak-free surface, avoid using harsh chemicals that can leave residue. Here are your options:
– Isopropyl alcohol (IPA): A 70% IPA solution is highly effective for removing oils, fingerprints, and general grime. It evaporates quickly, ensuring no residue is left behind.
– Mild dish soap and water: For an eco-friendly option, mix a few drops of mild soap with warm water. Be sure to rinse thoroughly, as soap can leave streaks if not removed.
– Window cleaners: While standard glass cleaners can work, make sure they are ammonia-free. Ammonia-based cleaners may leave streaks or damage certain types of window film.
4. Follow a Proper Cleaning and prepping Process
Here’s a step-by-step breakdown to ensure a spotless finish:
1. Dusting: First, use a dry microfiber cloth to wipe away loose dust and dirt. You don’t want to mix dust with the cleaning solution as it could lead to smearing.
2. Apply the cleaning solution: Spray your chosen cleaning solution onto the glass or onto a microfiber cloth. If you’re cleaning a large window, work in sections to prevent the solution from drying before you wipe it away.
3. Wipe in a circular motion: Using your microfiber cloth, wipe the surface in circular motions. This technique ensures that any residue is fully removed without smearing. Pay extra attention to edges and corners, which often hold dirt and grime.
4. Use a scraper for tough spots: If there are any stubborn areas like old adhesive or paint, use a plastic scraper or razor blade. Gently scrape at a 45-degree angle to avoid scratching the glass.
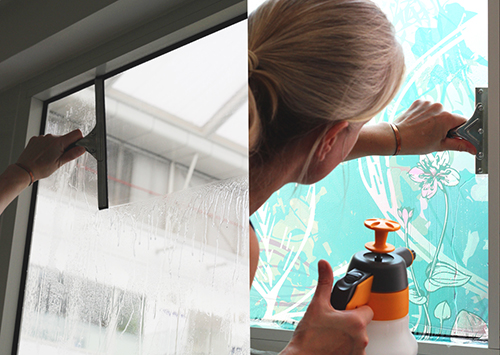
5. Final rinse: For a final pass, rinse the glass with clean water to ensure all traces of cleaning solution are gone. Use your squeegee to remove excess water, moving from the top to the bottom in one fluid motion.
5. Dry the Surface Completely
Once the window is clean, it’s essential that it dries thoroughly before applying the graphics. Even tiny amounts of moisture can interfere with adhesion. Use a dry microfiber cloth to wipe down the window or allow it to air dry completely. If you’re in a rush, you can use a hairdryer on a low setting to speed up the drying process—just be cautious to avoid heat on glass.
6. Final Check for Dust or Lint
Before installing the graphic, do a final inspection. Look closely to ensure no dust, lint, or fibers are left behind. A piece of painter’s tape can be useful for picking up any stray particles that may have settled on the glass after cleaning.
7. Control the Environment
The environment plays a critical role in the success of your window graphic installation:
– Temperature: Ideal window graphic installation temperatures range between 50°F (10°C) and 90°F (32°C). Extremely cold temperatures can make the vinyl stiff and reduce adhesion, while very hot conditions may cause the adhesive to become overly aggressive.
– Avoid direct sunlight: Direct sunlight can cause the glass to heat up, leading to premature drying of the graphic’s adhesive and bubbles. Install the graphics during cooler times of day or when the glass is shaded.
8. Wear Gloves for Application
When you’re ready to apply the window graphic, wearing clean, lint-free gloves helps you avoid leaving fingerprints or oils from your skin on the cleaned surface. Even slight amounts of oil from your fingers can reduce the effectiveness of the adhesive and cause imperfections in the graphic.
9. Consider a Wet Installation for Large Graphics
For larger or more intricate graphics, you may want to use a wet installation method. This involves lightly misting the window with a water and soap solution before applying the graphic. The moisture allows for repositioning and helps prevent air bubbles. Once positioned, use a squeegee to remove excess moisture and ensure firm adhesion.
Conclusion
The success of your window graphic installation starts with proper cleaning and prepping of windows. By following these best practices—inspecting, cleaning, drying, and controlling your environment—you ensure that the window graphics adhere smoothly, look professional, and last longer. Clean windows mean clean installations, and this attention to detail will make your graphics truly shine. Contact Graphic Solutions Group today to order your window graphics! And if this cleaning tutorial seems too much, we’d be happy to send our professional installers to do it for you.nd visibility. While digital channels continue to grow, the power of print lies in its ability to engage customers in a physical, personal, and lasting way. Let Graphic Solutions Group assist you with all your print/promo/display needs.
Contact us today and let us advise you how print can increase your sales.
Contact Us for More Information
Are you looking for a printer who can help you meet your deadlines?
Then your in the right place! Have any questions or concerns we would love to hear from you.
Please submit your information in this form and a sales professional will reach out to you.
Want to Speak to a Sales Representative? Call 770-424-2300